# ComfyUI
**功能最强大的模块化diffusion模型的图形用户界面和后端。**
[![Website][website-shield]][website-url]
[![Dynamic JSON Badge][discord-shield]][discord-url]
[![Matrix][matrix-shield]][matrix-url]
[![][github-release-shield]][github-release-link]
[![][github-release-date-shield]][github-release-link]
[![][github-downloads-shield]][github-downloads-link]
[![][github-downloads-latest-shield]][github-downloads-link]
[matrix-shield]: https://img.shields.io/badge/Matrix-000000?style=flat&logo=matrix&logoColor=white
[matrix-url]: https://app.element.io/#/room/%23comfyui_space%3Amatrix.org
[website-shield]: https://img.shields.io/badge/ComfyOrg-4285F4?style=flat
[website-url]: https://www.comfy.org/
[discord-shield]: https://img.shields.io/badge/dynamic/json?url=https%3A%2F%2Fdiscord.com%2Fapi%2Finvites%2Fcomfyorg%3Fwith_counts%3Dtrue&query=%24.approximate_member_count&logo=discord&logoColor=white&label=Discord&color=green&suffix=%20total
[discord-url]: https://www.comfy.org/discord
[github-release-shield]: https://img.shields.io/github/v/release/comfyanonymous/ComfyUI?style=flat&sort=semver
[github-release-link]: https://github.com/comfyanonymous/ComfyUI/releases
[github-release-date-shield]: https://img.shields.io/github/release-date/comfyanonymous/ComfyUI?style=flat
[github-downloads-shield]: https://img.shields.io/github/downloads/comfyanonymous/ComfyUI/total?style=flat
[github-downloads-latest-shield]: https://img.shields.io/github/downloads/comfyanonymous/ComfyUI/latest/total?style=flat&label=downloads%40latest
[github-downloads-link]: https://github.com/comfyanonymous/ComfyUI/releases
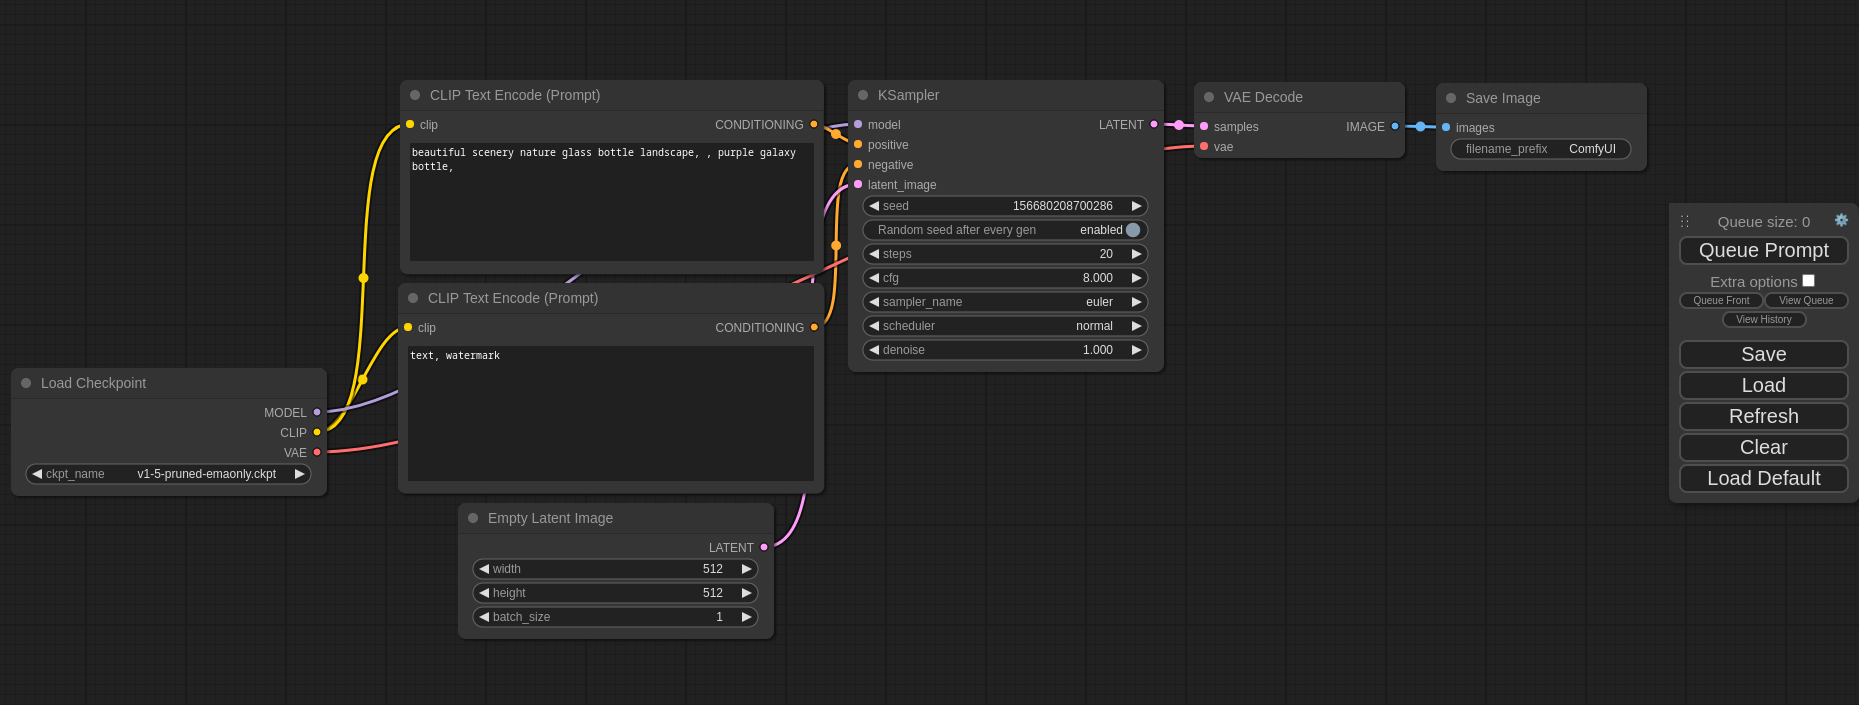
该界面可让您使用基于图形/节点/流程图的界面来设计和执行高级的stable diffusion工作流。如需了解一些工作流程示例,并了解 ComfyUI 的功能,请访问以下网站:
### [ComfyUI 示例](https://comfyanonymous.github.io/ComfyUI_examples/)
### [安装 ComfyUI](#安装)
## 特性
- 节点/图形/流程图界面,用于实验和创建复杂的stable diffusion工作流,无需编写任何代码.
- 完全支持 SD1.x, SD2.x, [SDXL](https://comfyanonymous.github.io/ComfyUI_examples/sdxl/), [Stable Video Diffusion](https://comfyanonymous.github.io/ComfyUI_examples/video/), [Stable Cascade](https://comfyanonymous.github.io/ComfyUI_examples/stable_cascade/), [SD3](https://comfyanonymous.github.io/ComfyUI_examples/sd3/) and [Stable Audio](https://comfyanonymous.github.io/ComfyUI_examples/audio/)
- [Flux 模型](https://comfyanonymous.github.io/ComfyUI_examples/flux/)
- 异步队列系统
- 许多优化:只重新执行工作流中在两次执行之间发生变化的部分。
- 智能内存管理: 可以自动运行模型在最低1GB虚拟显存的GPU上。
- 即使没有GPU也可以运行: ```--cpu``` (运行较慢)
- 可以加载 ckpt, safetensors and diffusers models/checkpoints. 独立的 VAEs and CLIP 模型。
- Embeddings/文本反转
- [Loras (regular, locon and loha)](https://comfyanonymous.github.io/ComfyUI_examples/lora/)
- [Hypernetworks](https://comfyanonymous.github.io/ComfyUI_examples/hypernetworks/)
- 从生成的 PNG, WebP 和 FLAC 文件中加载所有工作流 (with seeds) 。
- 以json文件格式保存和加载所有工作流.
-节点界面可用于创建复杂的工作流程, 例如 [Hires fix](https://comfyanonymous.github.io/ComfyUI_examples/2_pass_txt2img/) 或更高级的工作流。
- [图像区域合成](https://comfyanonymous.github.io/ComfyUI_examples/area_composition/)
- [重绘](https://comfyanonymous.github.io/ComfyUI_examples/inpaint/) 可常规重绘和使用重绘模型
- [ControlNet and T2I-Adapter](https://comfyanonymous.github.io/ComfyUI_examples/controlnet/)
- [放大模型 (ESRGAN, ESRGAN 变体, SwinIR, Swin2SR, 等)](https://comfyanonymous.github.io/ComfyUI_examples/upscale_models/)
- [unCLIP 模型](https://comfyanonymous.github.io/ComfyUI_examples/unclip/)
- [GLIGEN 模型](https://comfyanonymous.github.io/ComfyUI_examples/gligen/)
- [模型融合](https://comfyanonymous.github.io/ComfyUI_examples/model_merging/)
- [LCM 模型 and Loras](https://comfyanonymous.github.io/ComfyUI_examples/lcm/)
- [SDXL Turbo 模型](https://comfyanonymous.github.io/ComfyUI_examples/sdturbo/)
- [AuraFlow 模型](https://comfyanonymous.github.io/ComfyUI_examples/aura_flow/)
- [HunyuanDiT 模型](https://comfyanonymous.github.io/ComfyUI_examples/hunyuan_dit/)
- 使用 [TAESD](#如何展示高质量预览) 高质量预览
- 启动很快.
- 完全离线工作: 将不必在下载任何内容.
- [配置文件](extra_model_paths.yaml.example)设定检索模型的路径.
工作流示例可以参见 [示例页面](https://comfyanonymous.github.io/ComfyUI_examples/)
## 快捷键
| 快捷键绑定 | 效果 |
|------------------------------------|--------------------------------------------------------------------------------------------------------------------|
| Ctrl + Enter | 当前图作为生成队列 |
| Ctrl + Shift + Enter | 当前图作为第一个生成队列 |
| Ctrl + Alt + Enter | 取消当前生成 |
| Ctrl + Z/Ctrl + Y | 不做/重做 |
| Ctrl + S | 保存工作流 |
| Ctrl + O | 加载工作流 |
| Ctrl + A | 选中所有节点 |
| Alt + C | 收起/展开 选定节点 |
| Ctrl + M | 静音/取消静音 选定节点 |
| Ctrl + B | 绕过选定节点 (就像当前节点被移除出图并且线路重现连接穿过) |
| Delete/Backspace | 删除选定系节点 |
| Ctrl + Backspace | 删除当前图 |
| Space | 按住并移动光标时移动画布 |
| Ctrl/Shift + Click | 添加点击节点到选区 |
| Ctrl + C/Ctrl + V | 复制并粘贴选中节点 (而不与未选定节点的输出保持连接) |
| Ctrl + C/Ctrl + Shift + V | 复制和粘贴选定的节点(保持未选定节点的输出与粘贴节点的输入之间的连接) |
| Shift + Drag | 一次性移动多个选定节点 |
| Ctrl + D | 加载默认图 |
| Alt + `+` | 画面放大 |
| Alt + `-` | 画面缩小 |
| Ctrl + Shift + LMB + Vertical drag | 画面放大/画面缩小 |
| P | 按住/解除 选中节点 |
| Ctrl + G | 选中节点成组 |
| Q | 切换队列可见性 |
| H | 切换历史可见性 |
| R | 刷新图 |
| Double-Click LMB | 打开节点快速搜索面板 |
| Shift + Drag | 一次移动多条连线 |
| Ctrl + Alt + LMB | 取消选定插槽的所有连线 |
对于macOS用户,Ctrl键可以被Cmd键替换
# 安装
## Windows
在 [releases page](https://github.com/comfyanonymous/ComfyUI/releases) 上有一个适用于 Windows 的便携单机的构建版本,应当可以在 Nvidia GPU 上运行,也可以仅在 CPU 上运行。
### [下载链接](https://github.com/comfyanonymous/ComfyUI/releases/latest/download/ComfyUI_windows_portable_nvidia.7z)
下载后,使用 [7-Zip](https://7-zip.org) 解压并运行. 确保将 Stable Diffusion checkpoints/models (the huge ckpt/safetensors files) 放置于: ComfyUI\models\checkpoints
如果你遇到解压问题, 右键单击文件 -> 属性 -> 解除占用
#### 如何在其他 UI 和 ComfyUI 之间共享模型?
参见 [Config file](extra_model_paths.yaml.example) 去设定模型检索路径. 在独立的 Windows 构建版本中,您可以在 ComfyUI 目录中找到该文件。将此文件重命名为 extra_model_paths.yml,然后用你喜欢的文本编辑器进行编辑。
## Jupyter Notebook
在像 paperspace, kaggle 或 colab 等平台上运行服务,你可参见 [Jupyter Notebook](notebooks/comfyui_colab.ipynb)
## 手动安装 (Windows, Linux)
Git 克隆此项目.
放置 SD checkpoints (the huge ckpt/safetensors files) 到: models/checkpoints
放置 VAE 到: models/vae
### AMD GPUs (仅限 Linux )
如果尚未安装,AMD 用户可使用 pip 安装 rocm 和 pytorch,以下是安装稳定版的命令:
```pip install torch torchvision torchaudio --index-url https://download.pytorch.org/whl/rocm6.1```
这是安装带有 ROCm 6.2 的nightly版本的命令,该版本可能会有一些性能改进:
```pip install --pre torch torchvision torchaudio --index-url https://download.pytorch.org/whl/nightly/rocm6.2```
### NVIDIA
Nvidia 用户应使用以下命令安装稳定的 pytorch:
```pip install torch torchvision torchaudio --extra-index-url https://download.pytorch.org/whl/cu124```
这是安装 pytorch nightly 的命令,性能可能会有所改善:
```pip install --pre torch torchvision torchaudio --index-url https://download.pytorch.org/whl/nightly/cu124```
#### 问题排查
如果你遇到 "Torch not compiled with CUDA enabled" 错误, 使用命令:
```pip uninstall torch``` 卸载 torch
并且使用上述提到的命令重新安装.
### 依赖
在 ComfyUI 文件夹中打开终端,安装依赖:
```pip install -r requirements.txt```
在此之后,你应该安装完所有内容,并且可以运行 ComfyUI 了。.
### 其他安装选择:
#### Intel GPUs
Intel GPU 支持 适用于英特尔 Pytorch 扩展程序 (IPEX) 支持的所有英特尔 GPU , 支持要求列于 [Installation](https://intel.github.io/intel-extension-for-pytorch/index.html#installation?platform=gpu) 页面. 选择您的平台和安装方法,然后按说明操作.步骤如下:
1. 对于有需要的 Windows 和 Linux,首先安装上述 IPEX 安装页面中列出的或更新驱动程序或内核
1. 根据你的平台,按照指示说明安装 [Intel's oneAPI Basekit](https://www.intel.com/content/www/us/en/developer/tools/oneapi/base-toolkit-download.html) .
1. 根据你的平台,使用安装页面提供的说明安装 IPEX 包。
1. 依照 [ComfyUI manual installation](#手动安装-windows-linux)对于Windows 和 Linux的说明,如同上述所有内容安装完成后的描述照常运行ComfyUI
额外的讨论和帮助参见 [此处](https://github.com/comfyanonymous/ComfyUI/discussions/476).
#### Apple Mac silicon
您可以在苹果 Mac silicon(M1 或 M2)上安装 ComfyUI,并使用任何最新的 macOS 版本.
1.安装 pytorch nightly. 根据说明,阅读 [Accelerated PyTorch training on Mac](https://developer.apple.com/metal/pytorch/) Apple Developer guide (确保安装的是最新版 pytorch nightly).
1. 依照 [ComfyUI 手动安装](#手动安装-windows-linux) 对于 Windows and Linux的说明.
1. 安装 ComfyUI [依赖](#依赖). 如果已使用其他 Stable Diffusion UI 你也许可以重复使用这些依赖.
1. 运行 ComfyUI `python main.py`
> **注意**: 记得添加你的模型, VAE, LoRAs 等等到相应的 Comfy 文件夹, 如 [ComfyUI manual installation](#手动安装-windows-linux).中所述
#### DirectML (AMD Cards on Windows)
```pip install torch-directml``` 然后你可以运行ComfyUI: ```python main.py --directml```
# 运行
```python main.py```
### For AMD cards 不被 ROCm 官方支持
如果遇到问题,请尝试使用以下命令运行它:
对于 6700, 6600 或其他 RDNA2 或更旧版本: ```HSA_OVERRIDE_GFX_VERSION=10.3.0 python main.py```
对于 AMD 7600 或其他 RDNA3 cards: ```HSA_OVERRIDE_GFX_VERSION=11.0.0 python main.py```
# 注意
只有在图形的输出中包含所有正确输入的部分才会被执行。
只有每次执行都有变化的图表部分才会被执行,如果您两次提交相同的图表,只有第一次会被执行。如果您更改了图表的最后一部分,则只会执行您更改的部分和依赖于该部分的部分。
在网页上拖动生成的 png 或加载生成的 png,就能看到完整的工作流程,包括创建时使用的种子。
您可以使用()来改变单词或短语的强度,例如: (好代码:1.2)或(坏代码:0.8)。() 的默认强度是 1.1。要在实际提示符中使用()字符,请像 \\( 或 \\)一样将它们转义。
对于通配/动态提示词,可以使用 {day|night}。使用这种语法,“{wild|card|test}”将在每次排队提示时被前端随机替换为 “wild”、“card ”或 “test”。要在实际提示符中使用 {} 字符,请像下面这样转义:: \\{ 或 \\}.
动态提示还支持 C 风格注释, 如 `// comment` 或 `/* comment */`.
要在文本提示符中使用文本反转概念/embeddings 编码,请将它们放到 models/embeddings 目录中,并在 CLIPTextEncode 节点中使用,如下所示(可以省略 .pt 扩展名):
```embedding:embedding_filename.pt```
## 如何展示高质量预览?
使用 ```--preview-method auto``` 允许预览.
默认安装包括一个快速的低分辨率预览方式. 要允许高质量预览使用 [TAESD](https://github.com/madebyollin/taesd), 下载 [taesd_decoder.pth, taesdxl_decoder.pth, taesd3_decoder.pth and taef1_decoder.pth](https://github.com/madebyollin/taesd/) 并且放置到 `models/vae_approx` 文件夹. 一旦安装完成, 重启ComfyUI并通过 `--preview-method taesd` 运行以允许高质量预览.
## 如何使用 TLS/SSL?
运行命令生成自签名证书(不适合共享/生产使用)和密钥: `openssl req -x509 -newkey rsa:4096 -keyout key.pem -out cert.pem -sha256 -days 3650 -nodes -subj "/C=XX/ST=StateName/L=CityName/O=CompanyName/OU=CompanySectionName/CN=CommonNameOrHostname"`
使用 `--tls-keyfile key.pem --tls-certfile cert.pem` 允许 TLS/SSL, 应用可以访问 `https://...` 或 `http://...`.
> 注意: Windows 用户可以使用 [alexisrolland/docker-openssl](https://github.com/alexisrolland/docker-openssl) 或其中一个 [3rd party binary distributions](https://wiki.openssl.org/index.php/Binaries) 运行上述命令示例.
如果你使用容器, 注意 volume mount `-v` can be a relative path so `... -v ".\:/openssl-certs" ...` 将在命令提示符或 powershell 终端的当前目录下创建密钥和证书文件.
## 支持和开发频道
[Matrix space: #comfyui_space:matrix.org](https://app.element.io/#/room/%23comfyui_space%3Amatrix.org) (很像discord但是是开源的).
另可见: [https://www.comfy.org/](https://www.comfy.org/)
## 前端开发
自 2024 年 8 月 15 日起,我们已过渡到新的前端,该前端现在托管在一个单独的存储库中: [ComfyUI Frontend](https://github.com/Comfy-Org/ComfyUI_frontend). 现在,此项目将编译后的JS (来自 TS/Vue) 存放在 `web/` 目录下.
### 报告问题 和 需要功能特性
有关前端的任何错误、问题或功能请求,请使用 [ComfyUI Frontend repository](https://github.com/Comfy-Org/ComfyUI_frontend). 这将有助于我们更有效地管理和解决前端的特定问题。
### 使用最新的前端
新版前端是 ComfyUI 的默认前端,但是,请注意:
1. 在 ComfyUI 项目中,这一前端是每周更新的。
2. 在独立的前端项目中是每日发布的.
要使用最新的前端版本:
1. 对于最新的每日发布版本, 以下列命令行参数启动ComfyUI:
```
--front-end-version Comfy-Org/ComfyUI_frontend@latest
```
2. 对于特定的版本, 用需要的版本号替换 `latest` :
```
--front-end-version Comfy-Org/ComfyUI_frontend@1.2.2
```
通过这种方法,您可以在稳定的每周发布版本和最先进的每日更新版本之间轻松切换,甚至可以切换到特定版本进行测试.
### 使用旧版前端
如果出于任何原因需要使用传统前端,可以使用以下命令行参数访问它:
```
--front-end-version Comfy-Org/ComfyUI_legacy_frontend@latest
```
这将使用保存在 [ComfyUI Legacy Frontend repository](https://github.com/Comfy-Org/ComfyUI_legacy_frontend) 中的旧版前端快照
# 常见问题
### 我应该买什么样的GPU?
[参见此网页的推荐](https://github.com/comfyanonymous/ComfyUI/wiki/Which-GPU-should-I-buy-for-ComfyUI)